Destiny 2’s 19th season, known as the “Season of the Seraph,” introduces exciting new content to Bungie’s popular shooter. Alongside a range of new weapons and armor, the season also brings back a familiar mechanic called Warmind Nodes, which haven’t been seen since the Season of the Warmind in 2018.
Warmind Nodes are hidden caches of loot that contain updated versions of the four classic IKELOS weapons from the Season of the Warmind. It’s worth seeking them out, as you’ll need these new IKELOS weapons to focus and eventually craft them in the H.E.L.M.
In this guide, we will explain how to collect and use Resonate Stems, acquire Override Codes, and locate the Warmind Nodes scattered across the Moon, Europa, and the mission “Operation: Seraph’s Shield.”
Resonate Stems

Image: Bungie via Polygon
Resonate Stems can be earned from any activity in the game. For instance, you’ll receive two or three Stems per run from Crucible, Gambit, and Vanguard Ops activities. Once you have collected four Resonate Stems, you can combine them using the Resonance Amp to create an Override Frequency. The Resonance Amp includes the Resonate Stems and the Override Codes as part of a single item, so it won’t take up any additional space in your inventory.
Creating an Override Frequency will generate a four-word code that identifies the location you need to visit. These codes follow a consistent format: the first word indicates the planet, the second word denotes the loading area, and the last two words guide you towards the specific node. As you approach the node, your screen will glow orange, and you’ll hear old-fashioned music that grows stronger as you get closer. If you encounter any difficulties, we’ve provided detailed descriptions for each location below.
Europa Locations (1-6)
Here are the locations for each of the six nodes found on Europa.
1) Europa.Beyond.Cliff.Landing
:format(webp):no_upscale()/cdn.vox-cdn.com/uploads/chorus_asset/file/24273071/WarmindNodeLocations.Stems.jpg)
Image: Bungie via Polygon
You’ll find this node at the starting point of the main campaign for Destiny 2: Beyond Light. Travel to the “Beyond” landing zone, then follow the map until you reach the node.
2) Europa.Crossing.Outpost.Wall
:no_upscale()/cdn.vox-cdn.com/uploads/chorus_asset/file/24273071/WarmindNodeLocations.Stems.jpg)
Image: Bungie via Polygon
This node is located directly next to the spawn area of the “Charon’s Crossing” landing zone. Look at the outpost building across from where you spawn, then walk to the right ledge at the edge of the map and jump down to reach the node.
3) Europa.Ridge.Road.Ledge
:format(webp):no_upscale()/cdn.vox-cdn.com/uploads/chorus_asset/file/24273075/WarmindNodeLocations.1.Map.jpg)
Image: Bungie via Polygon
Spawn at the “Charon’s Crossing” landing zone, then ride your sparrow to the Cadmus Ridge area. As you turn right to enter the area, follow the left ledge and jump down to find the node.
4) Europa.Abyss.Fissure.Construct
:no_upscale()/cdn.vox-cdn.com/uploads/chorus_asset/file/24273075/WarmindNodeLocations.1.Map.jpg)
Image: Bungie via Polygon
Travel to the “Asterion Abyss” area and make your way to the top of the fissure overlooking the cave that houses the “Concealed Void” Lost Sector. The node can be found in the cubby to the right of the fissure.
5) Europa.Eventide.Cliff.Refuge
:format(webp):no_upscale()/cdn.vox-cdn.com/uploads/chorus_asset/file/24273079/WarmindNodeLocations.1.Node.jpg)
Image: Bungie via Polygon
This node is located next to the landing zone for the “Eventide Ruins.” When you spawn in, look down to your right and you’ll spot a tunnel. Travel through the tunnel until you reach the node.
6) Europa.Eventide.Dome.Catwalk
:no_upscale()/cdn.vox-cdn.com/uploads/chorus_asset/file/24273079/WarmindNodeLocations.1.Node.jpg)
Image: Bungie via Polygon
Head to the “Eventide Ruins.” You’ll find this node in the catwalks beneath the large, partially buried dome on the left side of the map.
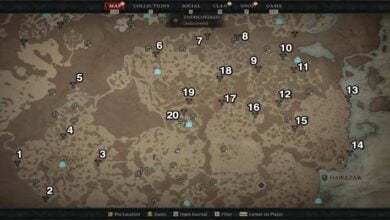
Moon Locations (7-12)
Here are the locations for the six nodes found on the Moon (Luna).
7) Luna.Archer.Dome.Catwalk
:format(webp):no_upscale()/cdn.vox-cdn.com/uploads/chorus_asset/file/24273085/WarmindNodeLocations.2.Map.jpg)
Image: Bungie via Polygon
Travel to the “Archer’s Line” area and follow along the right side until you reach a small structure with a dome on top. The node can be found in the catwalk-like rafters.
8) Luna.Archer.Crevasse.Crash
:no_upscale()/cdn.vox-cdn.com/uploads/chorus_asset/file/24273085/WarmindNodeLocations.2.Map.jpg)
Image: Bungie via Polygon
There is a large crevasse in the “Archer’s Line” area. Make your way along it until you find a small ledge with the node.
9) Luna.Hellmouth.Outcropping.Alcove
:format(webp):no_upscale()/cdn.vox-cdn.com/uploads/chorus_asset/file/24273091/WarmindNodeLocations.2.Node.jpg)
Image: Bungie via Polygon
The “Hellmouth” area contains a large underground section on the top right side of the map, before you reach the entrance to the deeper tunnel system when traveling from Sorrow’s Harbor. You’ll find the node in a small alcove within that underground area.
10) Luna.Anchor.Tower.Rotunda
:no_upscale()/cdn.vox-cdn.com/uploads/chorus_asset/file/24273091/WarmindNodeLocations.2.Node.jpg)
Image: Bungie via Polygon
This node is situated within the large tower structure at the center of the “Anchor of Light” area.
11) Luna.Sorrows.Altars.Recess
:format(webp):no_upscale()/cdn.vox-cdn.com/uploads/chorus_asset/file/24273093/WarmindNodeLocations.3.Map.jpg)
Image: Bungie via Polygon
Travel to “Sorrow’s Harbor” and head to the location on the map above. You’ll know you’re in the right place when you see a small doorway on a large wall. Go through that doorway, and you’ll find the node at the end of the small tunnel.
12) Luna.Sanctuary.Stage.Backdrop

Image: Bungie via Polygon
Spawn in the “Sanctuary” area, run past Eris, and look down behind the staging area. You’ll see the node tucked away on a small ledge.
Operation: Seraph’s Shield (13-16)
Once you complete the mission “Operation: Seraph’s Shield” for the first time, you’ll be able to create Override Codes for the nodes within the mission. Depending on the order in which your codes drop in, you may need to play the mission multiple times to collect all the codes. These four nodes will drop an IKELOS weapon that is guaranteed to have Deepsight Resonance.
13) Orbital.Engineering.Shaft.Platform
:no_upscale()/cdn.vox-cdn.com/uploads/chorus_asset/file/24273094/WarmindNodeLocations.3.Node.jpg)
Image: Bungie via Polygon
In the large open room above the first augment turn-in terminal, there is a platform. You’ll find the node on this platform.
14) Orbital.Engineering.Servers.Columns
:no_upscale()/cdn.vox-cdn.com/uploads/chorus_asset/file/24273094/WarmindNodeLocations.3.Node.jpg)
Image: Bungie via Polygon
In the room immediately after obtaining the “Operator” augment for the first time, head to the left. The node will be among the pillars.
15) Orbital.Logistics.Foyer.Hall

Image: Bungie via Polygon
When you reach the small room where you fight the first boss for the second time, look to the right. You’ll find a small room with three sets of lasers, and the node will be on the far side.
16) Orbital.Control.Nexus.Upload
:format(webp):no_upscale()/cdn.vox-cdn.com/uploads/chorus_asset/file/24273096/WarmindNodeLocations.4.Map.jpg)
Image: Bungie via Polygon
The final node is located on the left side of the room that contains the final chest.
Update, Dec. 20, 2022: We’ve added information about the “Operation: Seraph’s Shield” nodes.