Yeah, it’s an old game, but Legend of Mana has a lot of mechanics that players diving into the remaster should be prepared for. One of those mechanics is Artifact Placement, which is just one of the many aspects that Legend of Mana can be quite vague about.
Why is Land Placement Important?
To put it simply, land placement affects several key factors:
- Mana levels of Lands: The higher the Mana levels, the faster your produce will grow. Each Land has its own Mana value that can affect its neighbors.
- Unlocking Events: Certain events require specific levels of Mana. Some events also require specific Lands to be placed or have a certain number of them already on the map.
- Availability of Items: The timing of Land placements can affect a shop’s inventory, especially when it comes to crafting materials. Distance also affects potential difficulty and the availability of pets and different drop tables for monster levels.
It’s also worth noting that there is one Artifact that can only be placed on a water tile, so finding a spot that is flexible enough is important for those who want to optimize their gameplay. Additionally, Artifacts can only be placed adjacent to one another.
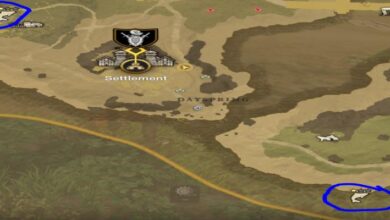
In the game, you have the freedom to pick a starting spot as long as the square isn’t grayed out, but the following placement is considered the most optimal, with only two water spots that meet the mandatory requirement:

via LOM.info
Easiest Setup
This setup is considered to be the most flexible, designed to be as easy as possible while providing access to:
- All Events
- All demi-human pets
- All levels of minerals and the highest possible weapon shop at the time of placement
- Full Mana Levels for Orchard for the fastest produce growing speed
Here’s a visual representation for easier reference according to this Legend of Mana Artifact Placement Guide. On NG+ (New Game Plus), this placement can become even better once you have access to Nightmare mode to increase monster levels for rare loot.
Step One

You begin the game with the Mailbox Artifact (Home), and you will also be given the Colorblocks Artifact (Domina) when you try to leave for the world map. To obtain the Wheel, you will need to encounter Niccolo in Domina’s market. Make sure to trigger his event, “Niccolo’s Business Unusual,” by telling him you’re not afraid of the bandits and agreeing to help him.
Step Two

To obtain the Jade Egg Artifact, follow Elazul into Domina’s pub. You can choose to stick up for Rachel or side with Elazul so that he joins you as a partner. If he leaves the pub, go out into Domina’s map, where after a short dialogue, he will join you no matter what you say. Rachel will give you the Jade Egg Artifact.
Step Three

This placement is to enable the Broken Doll (Junkyard) Land’s Gnome levels to spawn Fernando the Narcissos as a pet. The Narcissos requires Gnome Level 3 (maximum).
Step Four

You can choose to place the Sand Rose (Duma Desert) and Torch of Coral (Madora Beach) before placing the Firefly Lamp (Lumina). The Sand Rose’s placement will allow it to start with Dryad Level 2 and give the Medallion’s (Jungle) Land Salamander Level 2. The Torch of Coral will give Stone Eye’s (Lake Kilma) Wisp Level 3, allowing you to access Captain Dayang the Mad Mallard as a pet. Keeping the Firefly Lamp (Lumina) for later will upgrade its mineral shop to Level 2, and you can buy Level 4 weapons from its shop.
Step Five

The Golden Seed (Orchard) gives the Broken Doll (Junkyard) Gnome Level 3, allowing you to obtain Fernando the Narcissos. The Trembling Spoon (The Underworld) raises Torch of Coral (Madora Beach) to Salamander Level 2.
Step Six

This placement allows the Skull Lantern (Norn Peaks) to have Salamander Level 2, which upgrades to Level 3 once the Dragonbone is placed. As a result, you’ll be able to encounter Mambo the Tomato Man. The Green Cane (White Forest) will raise the Sand Rose (Duma Desert) Dryad Level, unlocking the Wimpy Thugling Event in the desert. On completion, you’ll gain access to Tikkle the Sahagin. For simplicity’s sake, an alternative placement option will not be covered here.
Step Seven

The placement of Moon’s Mirror (Tower of Leires) is to position a specific Land as far away from the Mailbox (Home) as possible to unlock a Level 4 Mineral Shop and Level 7 Weapon Shop. The Rusted Anchor (Popolta Harbor) will provide the Land with a Level 3 Mineral Shop and Level 6 Weapon Shop.
Step Eight

First, place the Frozen Heart (Fieg Snowfields), as the Sword of Mana (Tree of Mana) will give adjacent Lands Level 3 Mana levels. With full Mana levels thanks to the Sword of Mana, several things can occur:
- Unlocks the Seeing Double and Pee Wee Birdie events in Domina
- The Orchard can grow the best produce in the shortest time possible
- Guri the Goblin becomes available in Lumina, thanks to Shade and Dryad at Level 3
- Elysia the Succubus becomes available in Fieg Snowfields from Shade Level 3
Step Nine

The Brooch of Love (Lucemia) allows for the Tome of Magic (Geo) to be placed at the furthest possible point. The Tome of Magic’s placement gives the Land a Level 4 Mineral Shop and Level 7 Weapon Shop. The Pirate Hook (S.S. Buccaneer) can be placed whenever you’re able; with only two water spots, the timing is not as crucial.
And there you have it! To recap, this guide aims to simplify the Artifact placement process in Legend of Mana, especially for those unfamiliar with other systems within the game. At the very least, it will give you access to all the important aspects, and you can experiment with other placements in your own time.
If you want to explore other potential orders, you can refer to the original text guide here.
For further reading, check out our interview with the producer, Oyamada, here.