Introduction
The Dark and Darker Ruins is Ironmace’s inaugural attempt to create the surface level of the Dark and Darker world. Unlike its predecessor, The Forgotten Castle, this map can accommodate parties of up to two people. Notably, the Dark and Darker Ruins boasts a unique feature – a double Blue portal that allows all your friends to escape together.
The outdoor setting of this map offers players a distinct experience. Unlike the original map, Dark and Darker Ruins is characterized by open spaces, deviating from the corridor-heavy layout. Additionally, expect to encounter different and new types of monsters, such as the Dire Wolf, Cockatrice, Wisp, Giant Spider, and Giant Worm. For a comprehensive list of all the monsters in Dark and Darker, refer to our Beginners Guide.
Compared to the Goblin Cave or Crypts, Dark and Darker Ruins provides a slightly more forgiving environment due to its spacious and sprawling layout. Additionally, the new monsters in the Ruins aren’t as formidable for the most part. In the following sections, we will break down the Dark and Darker Ruins map, offering insights into its various points of interest.
Types of Enemies and How to Battle Them
The Ruins harbor a variety of enemies:
Skeletons
- Skeleton Archer: When facing archers, sidestep while advancing towards them.
- Skeleton Guardsman: Equipped with swords, these guardsmen possess decent range but slow swings. Hit them and retreat to avoid damage.
- Skeleton Footman: Similar to the Guardsman, the Footman wields swords and shields. Employ the same hit-and-move strategy.
- Skeleton Spearman: With the ability to hit hard from a distance, the spearman’s frontal attack is the most formidable. Dodge to the left to evade both its frontal attack and sweeping hit.
- Skeleton Crossbowman: This ranged monster is akin to the archer. Dodge left and right to dodge its shots, and then move in for the attack. Note that the Crossbowman has a lengthy reload time.
- Skeleton Axeman: Expect powerful blows from this monster. It is specifically designed to thwart players who rely solely on back-stepping to evade attacks. Dodge to the left to avoid its assault completely.
- Skeleton Mage: Beware of the mage when casting a Fireball, as it can prove fatal. Dodge or use line-of-sight tactics to avoid the Fireball, and then launch your attack. The mage is also capable of shielding itself or other monsters.
Other Undead Monsters
- Zombie: These creatures emit poison clouds that inflict damage. Their attack pattern resembles that of a mummy. They are slow, so strike, move away to dodge the poison cloud, and then attack again.
- Spider Mummy: Multiple Spider Mummies can pose a threat. Lower your aim and step back while attacking to eliminate them. Ensure you destroy the spider pot to prevent continuous spawns.
- Mummy: These lumbering enemies attack slowly and telegraph their moves. Strike and retreat, hitting them again after their swing. Repeat this process until they are defeated.
New Monsters
- Wisp: The Wisp attacks with magical projectiles. Exercise caution when killing it, as it explodes, blinding players in the vicinity.
- Dire Wolf: These wolves are relatively easy to kite. Try maneuvering left or right to outfox them. Keep in mind that they travel in packs.
Large Monsters and Mini-Bosses
Within the Ruins, you’ll encounter two mini-boss-like monsters and a large monster. Let’s explore their unique attacks and mechanics:
Cockatrice
The Cockatrice, a mythical creature with dragon and rooster characteristics, delivers powerful blows in Dark and Darker. With a staggering 1150HP, it poses a significant challenge. Beware of its shriek mechanic, which can petrify anyone who fails to avert their gaze in time. The Cockatrice’s other attacks include a jump kick and a forward peck.
The Cockatrice can spawn in two known locations:
The most effective strategy for battling the Cockatrice is to utilize high ground. Find a perch atop a Lion’s Chest to evade both melee attacks and the shriek. Alternatively, lead the Cockatrice to the center room of the map, where it can be trapped in the top right corner. Here, you can eliminate it without any concerns. However, keep in mind that the center room is a high-traffic area.
Giant Worm
The Giant Worm possesses the highest health among the elite monsters in the Dark and Darker Ruins. While it boasts several powerful attacks, most of them can be avoided. Watch out for its underground movement, as it will emerge and potentially deal damage. The Worm’s body swing can easily be jumped over. When the Worm lunges forward, sidestep to dodge its bite attack. Additionally, be cautious of its poison spit, as it can be troublesome. Understanding its attack patterns allows you to maximize your damage output between its assaults. Another effective strategy is to land a few hits and then retreat, forcing the Worm to burrow.
Keep in mind that the Giant Worm can also drop the Old Rusty Key, which can be used to farm a Treasure Horde pile in the Dark and Darker Ruins.
Giant Spider
The Giant Spider is an elite monster, although not quite on par with a mini-boss. Located in the underground temple one square north and east from the center room, this arachnid can be spawned by interacting with a fake goblet near the center of the room. Beware of its ranged poison spit, as it possesses considerable range. Engage the Giant Spider as you would any other enemy – bait a melee attack and retaliate. Ranged attacks are also a viable option.
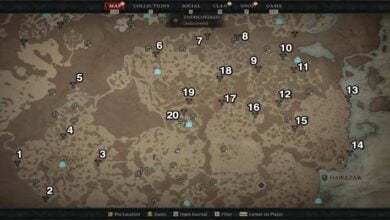
Points of Interest and Hidden Mechanics
The Dark and Darker Ruins feature several points of interest, offering both valuable loot and encounters with elite monsters. In this section, we will highlight a few notable locations within the map:
Graveyard
Located towards the bottom-left of the map, the Graveyard is a relatively less treacherous area of the Ruins. It is inhabited by several Skeletons and a Skeleton Mage. The tombs within the Graveyard provide excellent loot, as they function as chests. Due to their close proximity, looting the tombs is both swift and rewarding, making the Graveyard an efficient route for acquiring loot.
Underground Temple
As previously mentioned, the Underground Temple houses the Giant Spider. Discovering this location is as simple as heading to the red-circled area on the map and descending the stairs in that room. Upon entering the temple, loot the room and trigger the spawn of the Spider. Be aware that sometimes, instead of the Spider, a resurrection altar may appear.
Center Room – Secret Underground Lever
The central area of the Dark and Darker Ruins holds the highest potential for gold acquisition. While the room may initially seem unremarkable, a hidden lever awaits your discovery. Look out for four statues in each corner of the room. The statue with both hands intact conceals a lever. Interact with the lever to reveal a secret passage leading to a narrow corridor shaped like a square. Within this chamber, you will encounter the Giant Worm, which can be farmed for the Old Rusty Key.
Treasure Horde Room – Old Rusty Key
If you obtain the Old Rusty Key from the Worm or purchase it through the Trade channel, head towards the bridge area of the map. From there, descend below the bridge into an underground chamber. Remain vigilant, as you will encounter a few monsters along the way. Proceed through the room until you locate the Iron Door, behind which lies the Treasure Horde and several chests. Exercise caution when arriving at the entrance, as other adventurers may attempt to ambush or confront you. The Dark and Darker Ruins are replete with opportunistic dungeon delvers eager to claim your life.

Recommended Solo Classes
For solo players venturing into the Ruins, we currently recommend the following classes:
- Rogue: The Rogue possesses a considerable advantage due to its ability to exploit the numerous dark spots and leverage Double Jump to reach elevated positions.
- Warlock: Even without its full class kit, the Warlock excels as a solo class. Hellfire enables swift clearance of rooms and elite monsters, while also proving efficient when dueling against other solo players.
- Bard: The Bard is a self-sufficient class, capable of buffing itself and debuffing adversaries. In certain situations, the Bard can even form alliances, as some underestimate its capabilities when operating alone.
Conclusion
That concludes our comprehensive guide to the Dark and Darker Ruins. We will ensure its ongoing relevancy by updating it with any new additions. Be sure to check back regularly for the latest information. To explore more Dark and Darker guides and builds, click here.